|
||||||||||||||||
| Practice session |
|
Exercises
|
||||||||||||||
| The creation of a simple association activity |
|||||
| The objective of this practice session is to learn how to make a simple association activity. To do this, you will use different resources some of which are already in the media library, and others which you will have to add to it. You will save all the practice sessions in this module in a new project. |
|||||
| |
From JClic author, create a new project: File | New Project. Write the name of the project: modul 3. The name of the file which will include this project will be automatically introduced in the same way as in module 2, by following the route that is indicated. Click on OK. Go to the tab Project. The title you have given the project will appear in the section Description. Change the name for the correct spelling (module 3). Add: Activities for course D73 module 3 to the box Description. In the section User Interface, choose the skin: @green.xml.from the dropdown menu. This interface will affect the whole project. To do the first activity, simple association, for the project module 3, go to the following files: horse.wav, rooster.wav, dog.wav, pig.wav and question.gif. From the tab Media Libary,
click on the button to add a multimedia object
While holding down the Control key click on the files horse.wav, rooster.wav, dog.wav, pig.wav. and then on the button Open. As the files are not in the work folder, the programme will ask you if you want to copy the file you selected in the project folder. Click on Yes.You will do this four times as you have selected four files. Repeat this operation for adding a multimedia object, to select the image file question.gif. To do this more quickly choose the option:
To make sure you have the files you want in the work folder select again the option All Resources, in Type of File. From the tab Activities,
click on the button Go directly to the tab Panel. In the work environment, visualize the two grids necessary for this type of activity. You can see that each panel (A and B) has its corresponding tab. As this is a simple association, the grids have to have the same number of boxes (in this case 4) . Make up the panels with one line and 4 columns, and select distribution of the kind "A over B".
Make the boxes in Panel A 144 wide by 180 high, and those of Panel B 144 by 40. You can do this in two ways: by clicking on the edges and dragging them until you obtain the required size or by writing the numbers directly into the corresponding boxes. In the second case you will have to push the return key after writing the values.
Once the distribution of the panels is sorted out, (you can always modify the initial design), you will put the content in the boxes. This content is defined by the multimedia objects which are in the media library or by what is introduced into each box. In the boxes in Panel A introduce text, image and sound. Click on the first box. Fill in the dialogue box with the following:
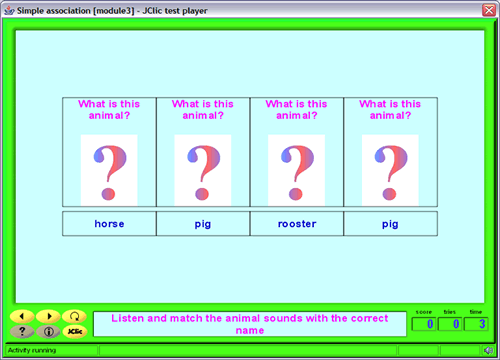
When you confirm with OK you will have finished the content for the first box. Repeat the procedure for the following three boxes, writing the text, the question mark and the sounds for rooster.wav, dog.wav and pig.wav. If you wish you can vary the positions of the text and the image in each box. Once you have filled in panel A, continue with Panel B. This will only have text content. Remember how you relate the boxes of the two panels for simple associations (Document: Simple Associations). Go to the tab in Panel B. Click on the first box. Write horse in the section Text and if you wish you can write a sentence to define this animal. Repeat the procedure for the animals you introduced into Panel A. Remember to put them in the same order as the sounds. To finish, and from the visual environment of the work, modify the style of each panel until you get results which are similar to the picture that appears lower down. You must also widen or narrow the grids until they are right for the content of the boxes. Try out the activity using From the tab Messages, introduce the initial message which invites the user to do the activity and a final message which congratulates him or her on completing it. From the tab Window, colour the main window (can be the same as the panels) and the game window. (if you select Transparent, the effect will be of no game window). When you are satisfied with the activity, save it in: File | Save. As you have already given it a name, you must confirm that you want to replace the file using the button Yes. |
||||
 |
|||||