| From JClic author, open the project module 4 (module4.jclic.zip).
Go to the tab Sequences  .
.
A list of the activities that you created for the project will appear.
First you must look at the order which the activities are in.
You have to move the activities around until they are in the order you wish to have them. This is an important decision as the success of the project as a learning activity depends on having the correct order.
The name of the activity can help you here because it gives you the necessary information to remember what it is about.
Click on the name of an activity and with the desplacement arrows  move it to where you think is best. (as this is a test sequence the order is not really important at the moment). move it to where you think is best. (as this is a test sequence the order is not really important at the moment).
Just as explained in the document you read before beginning this practice session, the forward and back buttons (arrows) in JClic can do various actions. At each point of the activity sequence you can assign specific actions to either of the buttons. The possible actions are:
Try marking various points in the sequence with labels. (you can write the text you want). Then define actions such as jump, pause, return etc.
In the test window, try out the effect that these changes have made using the button 
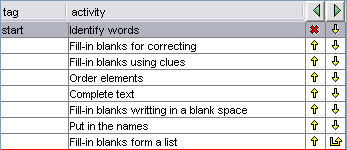
When you have finished testing, leave the sequence as you see it in the following image:

Make sure that the only changes are:
- Deactivate the Return button in the first activity, as there is no sense in going back from here.
- Assign the action "Return"
to the forward button in the final activity.Under normal conditions this would make us stay in this position, but if we come from another project, we will return to where we were.
- Introduce the label "Start" in the first activity.
It isn´t really necessary, but it can help us to define jumps if we wish to integrate this project in a larger one later on.
When you finish, test that the sequences are working correctly and save the project under its name, module4.jclic.zip. |